
Introduction
Git is a version control system designed to track changes to files and manage the history of those changes. It enables multiple people to collaborate on the same project simultaneously, maintaining a comprehensive history of each participant's modifications.
In this guide, you will learn how to install and set up Git on CentOS 7 and AlmaLinux 8.
Installation Guide
Step 1 - Install Git
To install Git, run the following command:
yum install git
To verify the installation, check the Git version:
git --version
The output will provide information about the installed Git version.
Step 2 - Set Up Git
Provide correct user information for Git by running these commands (replace with your actual username and email):
git config --global user.name "your_username"
git config --global user.email "your_email@domain.com"
This setup helps prevent Git errors in the future.
To verify the configuration, use:
git config --list
Step 3 - Modify Git User Data
You can edit user data anytime through the Git configuration file. Open it with this command:
vi ~/.gitconfig
Inside, you will see the data you provided earlier.
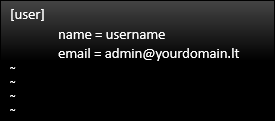
If needed, modify this data and save the changes (press Esc, then type :wq and press Enter).
Conclusion
That's it! You have installed Git and are ready to use it on your server. For more information about Git, visit the official project website