ConfigServer Security & Firewall Installation and Configuration Guide
ConfigServer Security & Firewall (CSF) is a robust Linux firewall security suite known for its ease of installation, flexible configuration, and additional security checks. It helps control incoming and outgoing traffic and protect the server from malicious attacks.
Preliminary Requirements:
Ensure you have one of the following OS versions installed: CentOS 7, Fedora 23, Ubuntu 16.04, or Debian 8.
Installation of ConfigServer Security & Firewall:
- For CentOS / Fedora:
Install the required Perl packages:
yum install perl-libwww-perl.noarch perl-Time-HiRes perl-core zip unzip bind-utils -y
- For Ubuntu / Debian:
Install the necessary packages:
apt-get install e2fsprogs dnsutils libwww-perl -y
- Download and Install CSF:
wget http://download.configserver.com/csf.tgz
tar xzf csf.tgz
cd csf
sh install.sh
- Verify Required IPTables Modules:
Run the following test to ensure all required IPTables modules are installed:
perl /usr/local/csf/bin/csftest.pl
A successful result will show:
Testing ip_tables/iptable_filter...OK
Testing ipt_LOG...OK
Testing ipt_multiport/xt_multiport...OK
Testing ipt_REJECT...OK
Testing ipt_state/xt_state...OK
Testing ipt_limit/xt_limit...OK
Testing ipt_recent...OK
Testing xt_connlimit...OK
Testing ipt_owner/xt_owner...OK
Testing iptable_nat/ipt_REDIRECT...OK
Testing iptable_nat/ipt_DNAT...OK
RESULT: csf should function on this server
- Enable CSF:
Edit the CSF configuration file:
Set the following values:
TESTING = "0"
RESTRICT_SYSLOG = "3"
Save the file and restart CSF:
If you encounter a warning about "[SENDMAIL]", fix it with:
echo '#!/bin/sh' > /usr/sbin/sendmail
chmod +x /usr/sbin/sendmail
Restart CSF again:
Enable ConfigServer Security & Firewall Web UI:
Install Required Perl Modules for Web UI:
For CentOS / Fedora:
yum install perl-IO-Socket-INET6 perl-Socket6 -y
For Debian / Ubuntu:
apt-get install libio-socket-ssl-perl libcrypt-ssleay-perl libnet-libidn-perl libio-socket-inet6-perl libsocket6-perl libwww-perl -y
- Configure Web UI:
Edit the CSF configuration file:

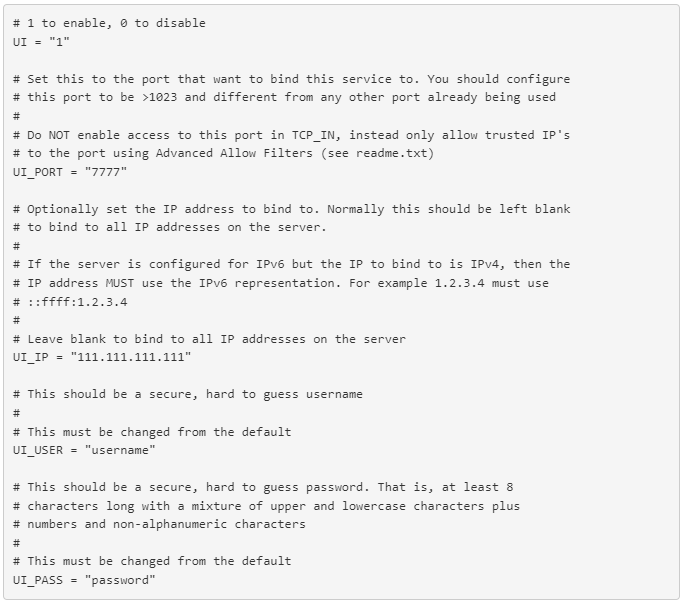
, where:
UI - should be "1" for enabled Web UI;
UI_PORT - port for accessing CSF firewall via the browser;
UI_IP - your server's IP address. Leave it blank to bind to all IP addresses on the server (e.g. if you have additional IPs);
UI_USER - username for accessing CSF firewall via the browser;
UI_PASS - password for accessing CSF firewall via the browser.
Add your public IP to the CSF Web UI allow list:
"your_public_ip_address" >> /etc/csf/ui/ui.allow
Restart the LFD daemon:
Access the CSF Web UI at: https://server_ip_address:port using HTTPS.
Note: use HTTPS to access Web UI.

DoS / DDoS Attack Prevention with CSF:
- Configure DoS / DDoS Settings:
Edit the CSF configuration file:
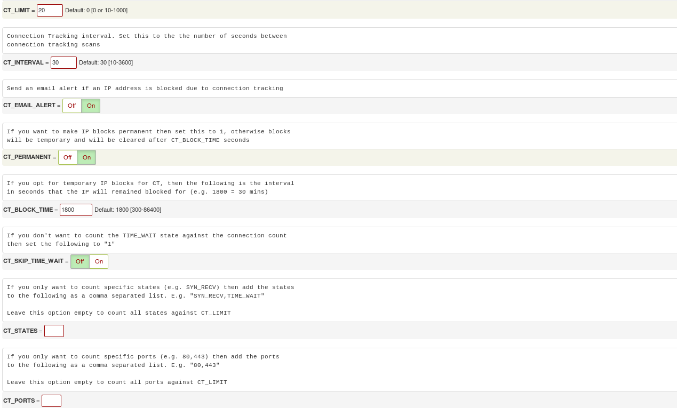
First of all you need to set up total number of connections allowed from single host:
CT_LIMIT = "20"
Set connection tracking interval (in seconds):
CT_INTERVAL = "30"
Enable email alerts sending for each blocked IP address:
CT_EMAIL_ALERT =1
Enable permanent IP addresses blocking ("1" to enabled, "0" for disabled):
CT_PERMANENT = 1
If you did not enable permanent IP addresses blocking, you could set interval (in seconds) within which IP will remained blocked:
CT_BLOCK_TIME = 1800
If you would like to enable it only for specific ports, you need to provide it in CT_PORTS. If you keep it empty, all ports would be checking:
CT_PORTS = "22,23,80,443"

Restart CSF and LFD:
csf -r && service lfd restart
For more information about ConfigServer Security & Firewall, visit ConfigServer's website.