NextCloud gives you control over your data, allowing you to store photos, calendars, contacts, and documents on a server of your choice. This tutorial, designed for a CentOS 7 VPS, will guide you through the installation process.
Preliminary Requirements
- CentOS 7 installed on your server.
- Install required dependencies:
yum install -y epel-release yum-utils unzip curl wget bash-completion policycoreutils-python mlocate bzip2 nano
- Ensure your server software is fully updated:
yum update
1. MariaDB Installation
- Install MariaDB:
yum install -y mariadb mariadb-server
- Enable MariaDB to start automatically on reboot:
systemctl enable mariadb.service
- Start MariaDB:
- Secure your MariaDB installation:
mysql_secure_installation
- When prompted for the root password, press Enter (no password set yet).
- Set a new root password and proceed by pressing Enter for the remaining prompts.
2. Apache and PHP 7 Installation
- Install Apache:
- Enable and start Apache:
systemctl enable httpd.service
systemctl start httpd.service
- Install necessary PHP modules:
yum install -y centos-release-scl
yum install -y rh-php72 rh-php72-php rh-php72-php-gd rh-php72-php-mbstring \
rh-php72-php-intl rh-php72-php-pecl-apcu rh-php72-php-mysqlnd rh-php72-php-pecl-redis \
rh-php72-php-opcache rh-php72-php-imagick
- Create required symlinks:
ln -s /opt/rh/httpd24/root/etc/httpd/conf.d/rh-php72-php.conf /etc/httpd/conf.d/
ln -s /opt/rh/httpd24/root/etc/httpd/conf.modules.d/15-rh-php72-php.conf /etc/httpd/conf.modules.d/
ln -s /opt/rh/httpd24/root/etc/httpd/modules/librh-php72-php7.so /etc/httpd/modules/
ln -s /opt/rh/rh-php72/root/bin/php /usr/bin/php
- Restart Apache to apply the changes:
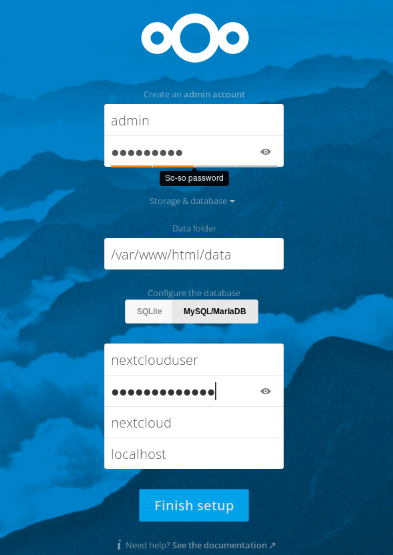
3. Creating a MariaDB Database and User
- Login to MariaDB:
- Create a new database:
CREATE DATABASE nextcloud;
- Create a new user:
CREATE USER nextclouduser@localhost IDENTIFIED BY 'your-password';
- Grant privileges to the new user:
GRANT ALL PRIVILEGES ON nextcloud.* TO nextclouduser@localhost;
FLUSH PRIVILEGES;
exit;
4. Enable Binary Logging in MariaDB
- Edit the MySQL configuration file:
- Add the following lines under the
[mysqld] section:
log-basename=master
log-bin
binlog-format=mixed
- Restart MariaDB:
systemctl restart mariadb
5. Download NextCloud Files
- Download the latest NextCloud package:
unzip nextcloud-18.0.3.zip
- Move the files to your Apache directory:
mv nextcloud/* nextcloud/.* /var/www/html/
6. Set Strong Directory Permissions
- Create a
permissions.sh script to set strong directory permissions:
Insert the content:
#!/bin/bash
ncpath='/var/www/html/'
htuser='apache'
htgroup='apache'
rootuser='root'
printf "Creating possible missing Directories\n"
mkdir -p $ncpath/data
mkdir -p $ncpath/assets
mkdir -p $ncpath/updater
printf "chmod Files and Directories\n"
find ${ncpath}/ -type f -print0 | xargs -0 chmod 0640
find ${ncpath}/ -type d -print0 | xargs -0 chmod 0750
printf "chown Directories\n"
chown -R ${rootuser}:${htgroup} ${ncpath}/
chown -R ${htuser}:${htgroup} ${ncpath}/apps/
chown -R ${htuser}:${htgroup} ${ncpath}/assets/
chown -R ${htuser}:${htgroup} ${ncpath}/config/
chown -R ${htuser}:${htgroup} ${ncpath}/data/
chown -R ${htuser}:${htgroup} ${ncpath}/themes/
chown -R ${htuser}:${htgroup} ${ncpath}/updater/
chmod +x ${ncpath}/occ
printf "chmod/chown .htaccess\n"
if [ -f ${ncpath}/.htaccess ]
then
chmod 0644 ${ncpath}/.htaccess
chown ${rootuser}:${htgroup} ${ncpath}/.htaccess
fi
if [ -f ${ncpath}/data/.htaccess ]
then
chmod 0644 ${ncpath}/data/.htaccess
chown ${rootuser}:${htgroup} ${ncpath}/data/.htaccess
fi
Run the file:
bash permissions.sh
7. NextCloud installation
Open your server hostname or IP address in the browser and finish the installation.