
Sentora is a control panel for web servers that, by default, includes PHP 5.3.20, MySQL 5.5.29, and Apache 2.4.3. Note that these versions may be updated by Sentora in the future. This guide is intended for use with CentOS 7 on Standard VPS or KVM Linux services.
Disclaimer: Sentora is no longer actively developed and is not recommended for use on production servers.
Requirements
- Root access (sudo will not work).
Recommendations
- Point a sub-domain to your server IP address for easier access to the panel post-installation. Consider changing your server hostname if needed before installation.
Installation Steps
Prepare the OS Template
- Sentora requires a minimal OS installation. Follow our guide to minimize your OS template: [Make Minimal OS](https://).
Start the Installation
- Install
curl if not already installed:
- Begin the Sentora installation:
- Complete Installation Configuration
- The installation will proceed automatically. You will be prompted to configure:
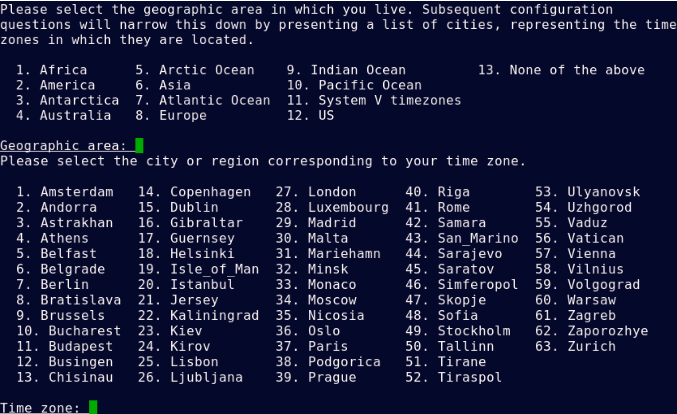
- Timezone: Select your geographic area and city. In our example Europe has been used:
After selecting the time zone, you will need to configure the sub-domain and IP address for the Sentora panel. By default, the installation guide will suggest using your server's hostname as the panel's address. However, you can change this to any other sub-domain that points to your server. The IP address will be automatically filled in and should typically remain unchanged, unless you have multiple IP addresses for your server and wish to use an additional IP. In that case, ensure the sub-domain is pointed to the selected IP address.
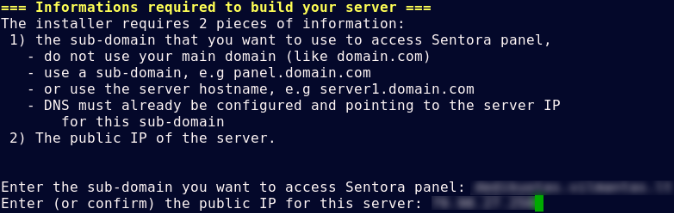
Enter the sub-domain you want to access Sentora panel: your.sub-domain.tld
Enter (or confirm) the public IP for this server: 12.34.56.78
If the sub-domain is correctly pointed to the specified IP address and the IP matches your VPS, a DNS check will be performed, and the installation will complete.
4. Finishing the Installation
Once the installation is complete, you will receive the login credentials for the Sentora panel, including randomly generated passwords.

The Sentora panel login will be "zadmin," with the password provided below it. You can copy this information from the console during installation or later find it in the /root/passwords.txt file on the server.
To complete the installation, you will need to restart the server. You can do this by entering "y" in the console and pressing "Enter."
5. Changing the Password
After logging into the Sentora panel, you can change the password for the "zadmin" user. To do this, go to the menu, select "Account Information," and choose "Change Password."